I’ve discovered that I have developed a love for lanterns. It could be their rustic nature…Or it could be that anytime I see one, I’m reminded of the first time Jacque and I ever went camping together (Insert pause for sentimental reader reaction…Ahhh)…Well, whatever it is, I’m drawn to them.
And as a firefighter, of course, I have a love for LED lights! (Generally, the brighter, the better!) But I found that most of the LED lanterns that I came across were missing character…But thanks to an amazing post that Jacque shared with me written by Kelly from View Along the Way, I found everything I needed to make my own LED Lantern!


Kelly had written a post on How to Make Any Lamp Cordless. As soon as I saw what she had done, I knew I had found a solution that would let me combine my love of lanterns and LED’s without taking away from the character of the lantern!
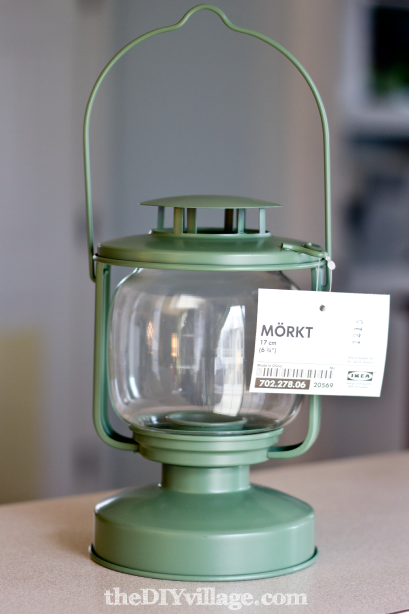
While driving home from Ohio after Christmas in a pretty substantial snow storm, we were faced with a decision…Do we diligently stay our path and make our way home as quickly as possible…or do we throw caution to the wind and risk getting stuck in even worse snow conditions by taking the exit off of the interstate that would lead us to…IKEA! Of course, we “took shelter” at IKEA. And I’m glad that we did because while strolling the isles, I happened upon this MÖRKT Tealight Lantern. It had the look I wanted in a lantern and its design would work nicely for the LED conversion that I had in mind…So $5.99 (plus tax) later, I had the first piece to the puzzle!
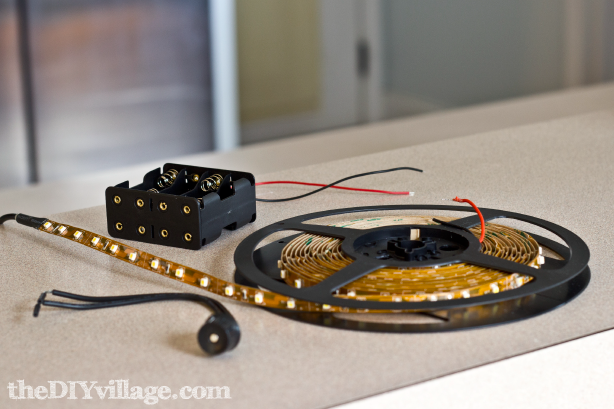
Next, I got onto Amazon and ordered the LED strip and battery pack
I needed. I wanted to find a switch that looked like a fuel cap that might be found on a kerosene lantern. Luckily Lowes is only about 5 minutes away and I found a rotary switch that would aesthetically work for me. Now it was time to put the pieces of this puzzle together!
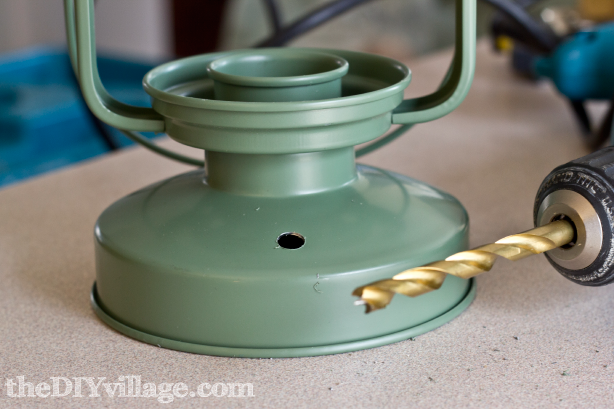
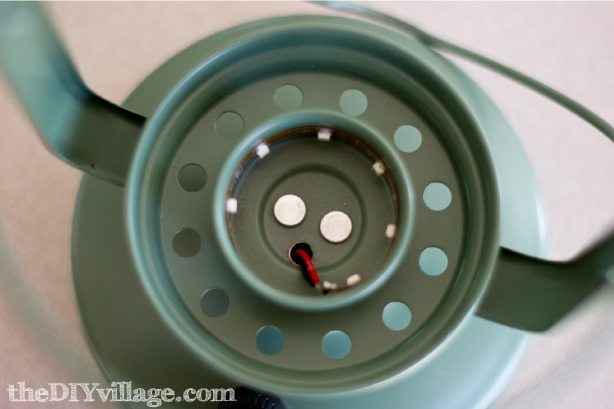
The first thing I had to do was to drill a hole in the base of the lantern, just large enough to fit the threaded end of the rotor switch through.
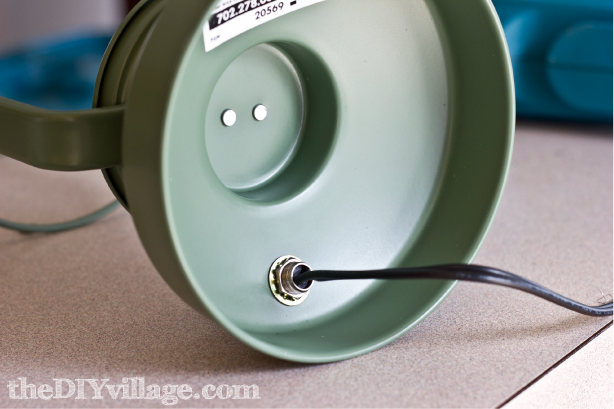
On the under side of the base, I secured the switch in place with a washer and nut. (Both are included with the switch)
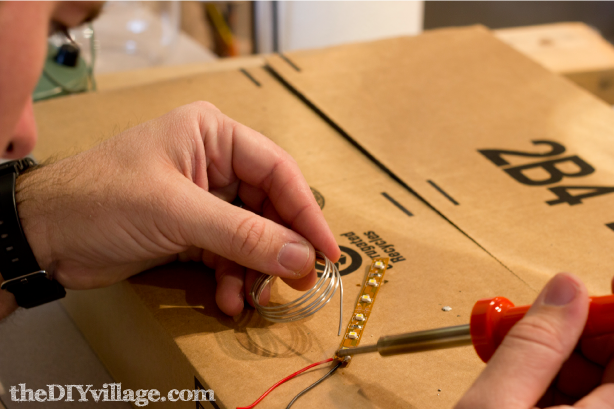
Now I was ready to solder the wires onto the LED strip. I followed Kelly”s instructions on wiring up the fixture. The only difference was that my red and black leads went from the LED strip directly to the battery pack, so I didn’t have existing wiring from the lamp to deal with, and because of that, I also had to install my own switch. More on that in a minute!
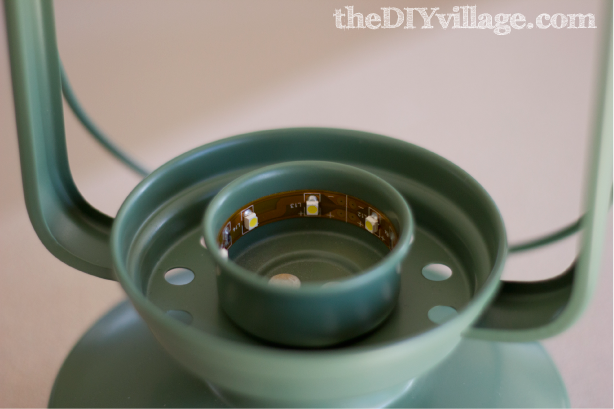
I didn’t want to lose the rustic look of the lantern, so to help hide the wires, I lined the inside of the tealight tray with the LED strip. (You could always move them to the outside of the tray, or any where else on the lantern, if you want more light). It’s got an adhesive backing on it, so all I had to do was peel the paper off and adhere it to the surface! Placing it there also gave me easy access to the hollow base below.
I drilled a small hole in the tea light tray, just large enough to fit the wires through, and just like that, I was ready to wire in the rotary switch and the battery pack!
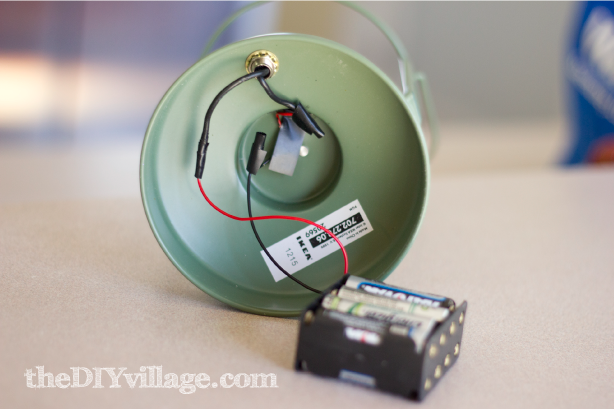
Adding the switch is really simple…In theory! The switch is wired in-line on either the hot or the ground wire. (In-line meaning that you choose either the red or black lead, cut it, and then connect the wires from the switch into the lead you just cut)
Now, I have to confess that I wasn’t paying close enough attention to what I was doing when I wired the switch the first time…Yes, I said the first time. I wired one side of the switch to the hot wire and the other end to the ground…The result…I created a short in the wiring! Jacque, who was holding the battery pack, very calmly asked me why the batteries were getting so hot…In a few short seconds she looked like she was playing hot potato with the battery pack as she very quickly handed it off to me! I had enough time to start removing the batteries just as the plastic ends of the battery pack began to melt! It took a call to my Dad and my Father-In-Law before I even figured out what I had done! Not my proudest moment! But I gracefully recovered and corrected the wiring on the back-up battery pack that I had luckily ingeniously purchased!
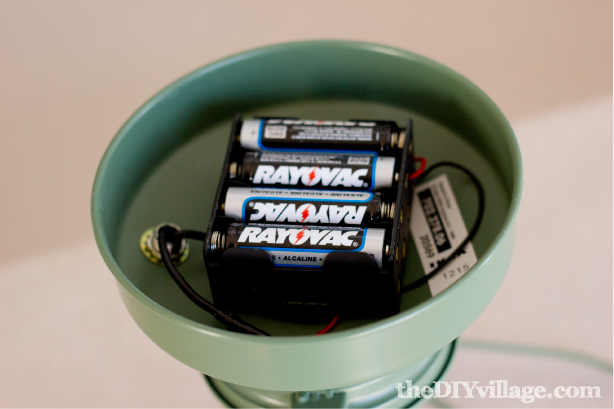
The battery pack fit nicely in the hollow base.
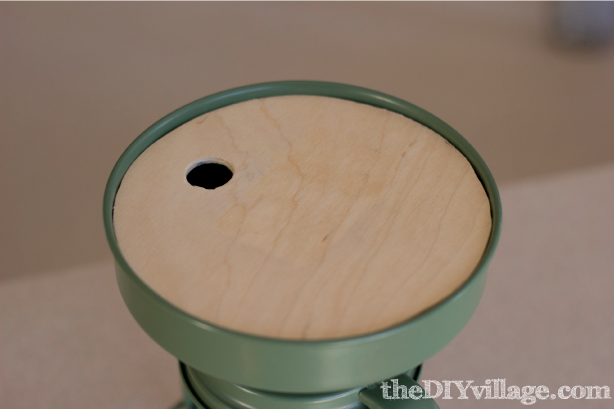
To finish off the lantern, I cut a small piece of luan to snuggly fit in the under side of the base. Then to make it easy to remove, I drilled a hole in the luan to use as a pull.
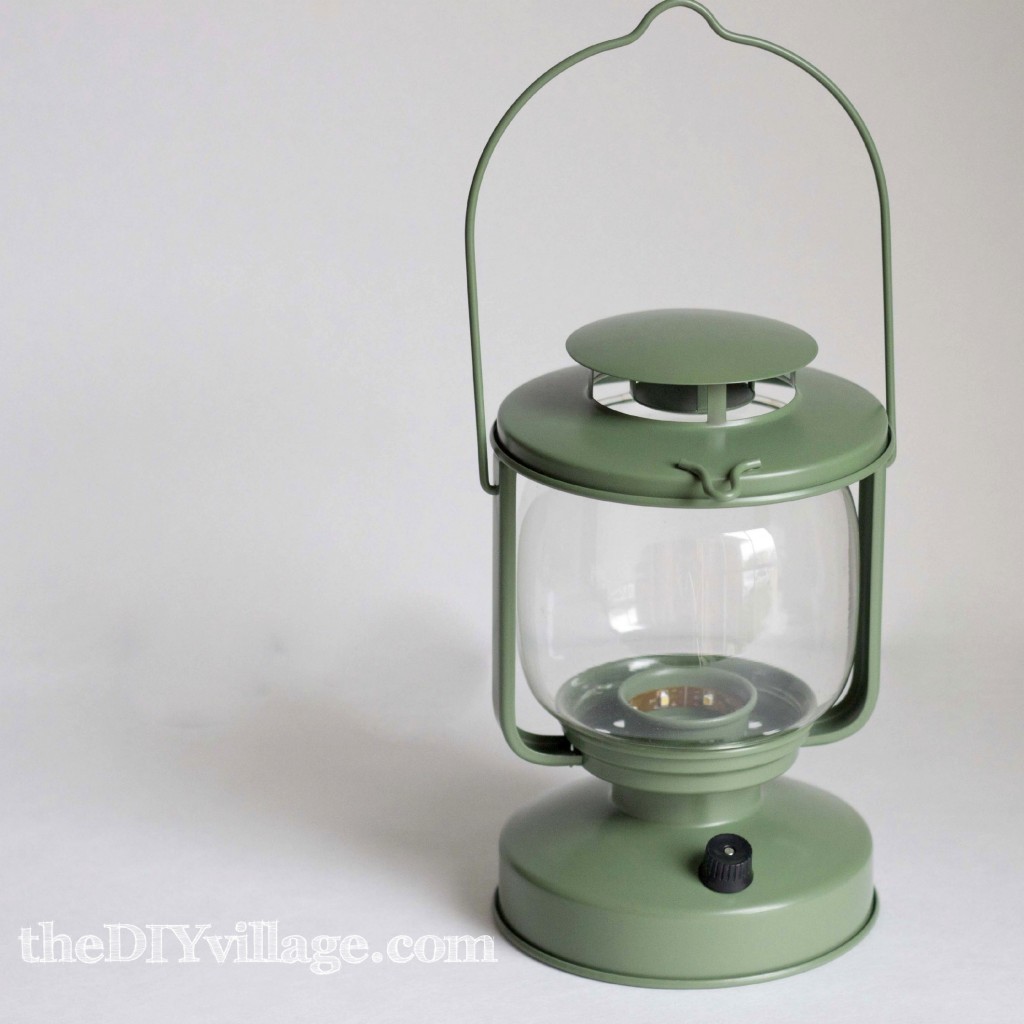
So this is it! My IKEA MÖRKT Tealight converted into an IKEA MÖRKT LED Lantern!
The coolest thing about this project was getting to use the LED strips. It’s a pretty versatile product, and very inexpensive when you look at the cost of most LED’s.
What projects can you think of using them for?
(Just as an additional warning, I want to point out that the LED strip is rated for a 12 volt power supply, do not use anything rated higher than that for this product as it could lead to injury.)
Matt, you are awesome! Thanks so much for a great idea! Also love the doggie chairs:)
Pearl, you’ve made my day! Thank you for taking the time to leave us such great feedback!
That’s fabulous Matt! I would have “took shelter” at Ikea too and waited out the storm (they DO have everything there!) Your lamp turned out great and thanks for the detailed tutorial!
Heather, you’re absolutely right, they do have EVERYTHING! What I didn’t include in the post was a description of the other 2 bags of stuff we bought while we there! Thanks for letting us know what you thought of the lantern!
Yay! I LOVE the idea of using the LED strips for a lantern: brilliant! And it’ll be perfect for camping. Not long ago, the power went out in our whole neighborhood and guess who was chillin’ by the light of a little brass lamp? These guys! 🙂 Thanks for the link love and the inspiration. I’m feeling a trip to Ikea coming on…
Kelly, I’m really glad you like it! I’m so thankful that Jacque introduced me to View Along the Way! I’m sure this won’t be the last time I find inspiration from your projects! And on a side note, LOVE the “refresh” on your site!
That is pretty sweet! Did you just have to make sure to buy a battery pack rated for 12v too?
You’ve got it Ethan! As long as you’ve got a 12 volt power supply, AC or DC, it will be good to go. The nice thing about those LED strips is that they come with an adapter for an AC power supply, but they’re easily set up for DC like I used them! I’m honored to have you stop by Ethan! I’m a big fan of oneprojectcloser.com!
Wow, you have guys have taken IKEA hacks to a whole new fantastic level! WOW!
Thanks Keri! That’s quite a compliment! This was a fun project to work on, especially the “Hot Potato” moment!
Wow. This is fantastic!
Melissa, these LED ribbons are insane! Totally keep them in mind for any upcoming projects! Thanks for stopping in!
I LOVE this tutorial. I’m totally showing my husband, he loves LED DIYs. Thank you so much for sharing!! 🙂
Tiffany, I don’t think your husband would be disappointed! From one LED Lover to another, I’m still amazed how easy they were to work with!
What a cool idea! This turned out great. Love it!
Erin! Thanks for the LED love! Hope all is well with you and DIYontheCheap.com!
What a great project! I love the idea. I’m thinking about all those cute decorative lanterns I’ve seen. Those LED strips are really intriguing. How do they compare to say an LED tea light?
Bethany, Glad to hear you like our Lantern Hack! The LED Ribbon is amazing! Depending on the length you use, they are really bright! Much brighter than what I’m used to seeing in an LED tea light!
Matt, this is awesome. I loved Kelly’s tutorial and this one puts an even more unique spin on it. I’m going to have to get my hands on some of that LED ribbon for sure! Pinning!
Ashley, You definitely won’t be sorry if you try out the LED ribbons! I am honored that you’ve stopped by! I’ve been a silent fan of Domestic Imperfection for a good while!
What an awesome idea! I’m sure that Jon could whip up something like this for us! Love it!
Katie, he should totally do it! This won’t be the last post I used these awesome LED ribbons!
Very cool idea~~ Easy step by step too. Thanks for sharing guys!
Thanks Debbie! This was a fun project to try out! Now I’m off to see what else I can light up in the house!
Great tutorial with clear instructions! I love Ikea, thanks for sharing your project!! Great idea when you want to put a lamp somewhere and there is no convenient plug nearby! Isn’t it baffling sometimes where a builder places outlets (or doesn’t!)?? 😀
Thanks Heather! I was actually really surprised how easy it was to wire the lantern! It will definitely solve the lack of outlets around the house!
I love this idea! I am a new follower! I found your link at the “It’s Party Time” party. I would love for you to link up to my weekly linky party Fluster Muster on Wednesday’s
Thanks for the follow Robin! We’ll definitely stop by and link up to “It’s Party Time” party!
Wow. I love DIY stuff. This is great. I would love to have you link this up at my new linky party so that others can benefit from this unique project. Thanks, Linda
Wow! Very nice! I love the way it turned out. And thanks for the tutorial.
Have a great day.
Pam
Hey Pam, Thanks for stopping by and taking the time to leave us some feedback! We popped over to your site and saw the Pottery Barn Inspired Buffet that you and your husband made! Love it!
Very innovative! Great project…thanks!!!
Thanks Eileen, I wish I had found those LED ribbons sooner! Thanks for stopping in!
Wow! What an awesome project. I’m impressed. 😀 Thanks for linking up. IT’S A PARTY @ Three Mango Seeds
What a great idea! Love it!
Great idea! You’ll be able to use it so much more!
You’re absolutely right Ashley! I am thinking how nice it will be to use them in the backyard in the summer!
Super cool!!! Love your tutorial. Pinning:)
Thanks for the pin Michele! This was a fun project for me to play around with…Jacque better be careful…There’s a lot of stuff in our house that I could turn into an LED light fixture now!
Very cool! I have a lantern I want to turn into a wired lamp, but I like yours, too. May need to find another lantern….
I know how you feel Sheila! I’m on the look out for my next LED conversion…May need to head back over to IKEA! Thanks for stopping in!
What a great idea!! Thanks for sharing this. I look forward to seeing you at My Dream Canvas. I am visiting you from Tuesday Treasures. Thanks Anu!
I just love this idea. How easy to make too. Love looking around your lovely blog. Have a great week.
Hugs,
Vanessa
Vanessa, I’m glad you liked the Lantern Conversion! We appreciate you taking a look at the site, we’d love for you to come back often!
Great post! I’ll be featuring it this evening on Craft Gossip 🙂 http://homeandgarden.craftgossip.com/
Amanda, that’s awesome! Thank you so much!I GREATLY appreciate the feature!
Thanks so much for sharing your creativity at It’s Party Time! Great tute and great idea for those spaces where an outlet is not handy!
I featured you today here! http://www.settingforfour.com/2013/01/its-party-time-1-20-2013-linky-party.html Thanks so much for linking up last week – hope to see more of your creativity at this week’s party!! Have a super weekend!
Heather! That is AWESOME! Thank you SO much for the feature! Aside from melting the first battery pack, that was a really fun project!
Question how did you wire them wrog the first time ,knowing me I will do the same thing too. lol Thanks for any Help Ron
Ronald, when I wired in the switch, I basically crossed the wires. One of the leads from the LED ribbon should have been wired into the switch and then to one terminal on the battery pack. The other lead should have gone straight to the other battery pack terminal. Well I wired both wires from the LED ribbon to the switch, then to the battery pack…Definitely, the wrong way to do it! Thanks for stopping in Ronald! If you think of any more questions that I can help with, don’t hesitate to ask!
My husband has this exact lantern in his office…this is such a great idea to have on hand in case the power goes out at the office! Newest follower!
Stacey, You’re right about it being handy if the power goes out! Just ask Jacque. She’s had the unfortunate opportunity to use our lantern when the weather knocked out the power!
I love this! Great idea. I host a DIY link party every Monday and would love for you to join! http://homecomingmn.blogspot.com/2013/02/the-diyers-link-party.html
Very Cool Matt! I’m wondering if you know how long the 4 AA’s in the battery pack will power the lamp?
Hey Steve! There’s actually a total of 8 AA batteries total in the pack. I haven’t followed the life span and power consumption of the batteries in the lamp, but the LED’s are pulling such a minimal draw, I haven’t had to change them out yet!
I absolutely love these. I have been wanting to do a similar project to use as bedside lamps for my master bedroom. I love the look of these IKEA lanterns. But unfortunately I’m over 8 hrs from the nearest IKEA and they don’t sell these lanterns online. 🙁
WOW! That is so awesome. Who knew that you could change out the plug to a battery pack. I would love to take this camping. BRILLIANT