Since sharing our Kitchen Pantry Reveal, we’ve gotten a lot of emails from our readers asking about how to build a pantry. After having an opportunity to learn some basics of Google Sketch Up from the super talented, Rayan Turner from The Design Confidenital, I thought it would be fun to sketch up our pantry cabinet plans and share how to build a pantry!

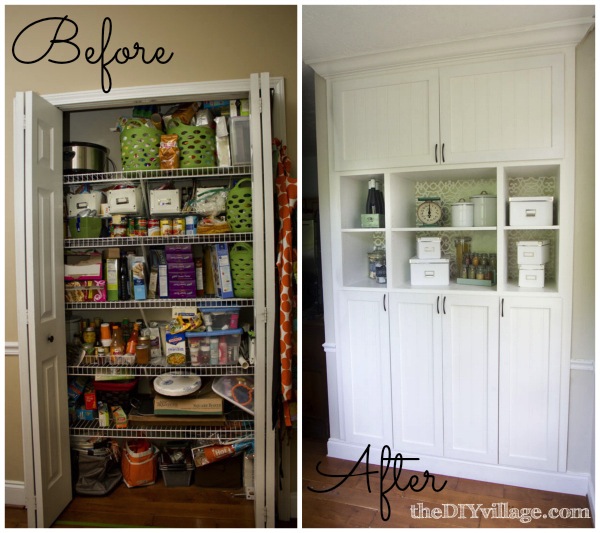
Here’s a quick reminder of the before and after pics of our pantry!
And for those that are intimidated by the idea of taking on such a large project, consider getting in touch with our amazingly talented friend, Sandra of Sawdust Girl! She coaches DIY’ers through projects just like this! Check out this massive Studio-Craft Room that one of her clients was able to build!
Just a quick note: For those of you wanting to build a pantry based on these plans, you may need to modify the height of the cabinets, as we have 9′ ceilings which I don’t believe to be the norm!
Material List:
- 6- 4′ x 8′ Sheets of 3/4″ Cabinet Grade Plywood
- 2 – 4′ x 8′ Sheets of 1/4″ Luon
- 2 – 1 x 4 x 8′ Poplar Boards
- 2- 1 x 3 x 10′ Poplar Boards
- 1-1/4″ Kreg Fine Thread Screws
- 18g Brad Nails
- 3/4″ Premium Wood Screws
- 2-1/2″ Premium Wood Screws
Tool List:
- Table Saw
- Circular Saw
- Miter Saw
- Drill
- Kreg Jig Jr.
- KREG Shelf Pin Jig
- Air Compressor and Brad Nailer
Pantry Cabinet Cut List:
- 6 – 3/4″ Cabinet Grade Plywood @ 76″ x 20″
- 3 – 3/4″ Cabinet Grade Plywood @ 56″ x 20″
- 2 – 3/4″ Cabinet Grade Plywood @ 28″ x 20″
- 1 – 3/4″ Cabinet Grade Plywood @ 26 1/2″ x 20″
- 3 – 3/4″ Cabinet Grade Plywood @ 22 1/2″ x 20″
- 4 – 3/4″ Cabinet Grade Plywood @ 14″ x 20″
- 2 – 3/4″ Cabinet Grade Plywood @ 12 1/2 x 20″
- 2 – 3/4″ Cabinet Grade Plywood @ 5″ x 56″
- 3 – 3/4″ Cabinet Grade Plywood @ 5″ x 18 1/2″
- 1 – 1/4″ Luon @ 28″ x 76″
- 2 – 1/4″ Luon @ 14″ x 76″
- 1 – 1/4″ Luon @ 56″ x 24″
- 1 – Poplar @ 3″ x 60 1/2″
- 2 – Poplar @ 3″ x 100″
- 1 – Poplar @ 1 1/2″ x 22 1/2″
- 2 – Poplar @ 1 1/2″ x 54 1/2″
- 2 – Poplar @ 1 1/2″ x 46 1/4″
- 2 – Poplar @ 1 1/2″ x 28 1/4″
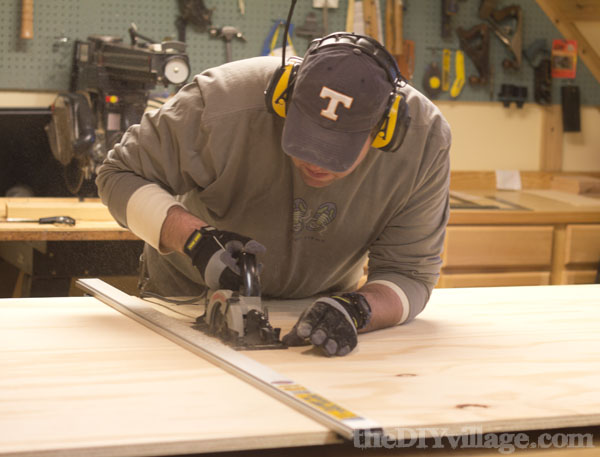
Cutting Tip:
By taking a look at the cut list, you’ll see that there are a number of plywood pieces that are cut to the same length. You may find it easier to cut some of the sheets to length first by using a circular saw and a straight edge.
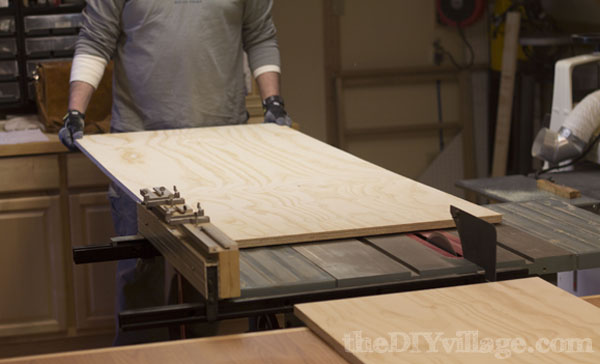
Using a table saw, rip the plywood and 4″ poplar boards to the correct widths. The poplar boards that get ripped down to 1-1/2″ will be used for facing once the cabinets are built and installed.
Pantry Cabinet Assembly:
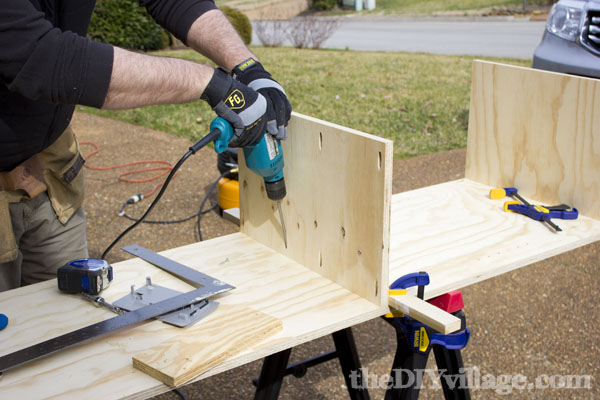
With the plywood ripped and cut to length, it’s time to build a pantry! All of the cabinets are assembled using pocket holes made with a Kreg Jig. If you’re not familiar with how these work, take a minute to check out my walk through of how to use a Kreg Jig Jr.
First, build the two outer cabinets.
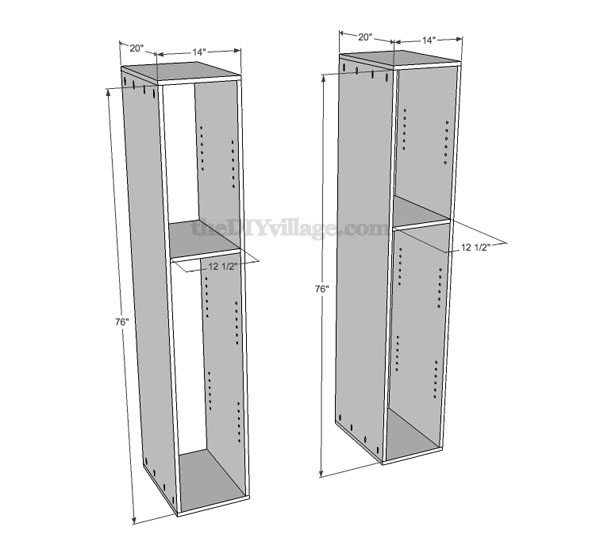 Measure down 29″ from the top of the frame and clamp a straight edge in place for the fixed shelf to rest against as you screw it into place. For easier installation of the fixed shelf, screw it in place before attaching the second side of the cabinet.
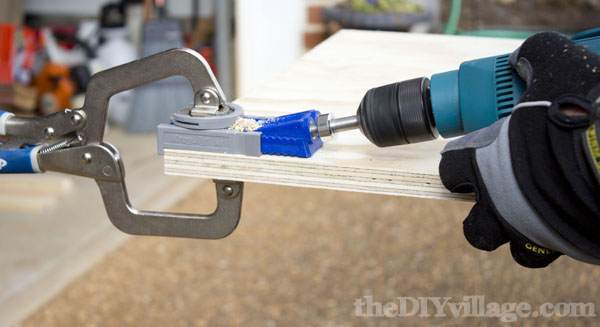
If you’ve never seen the KREG Shelf Pin Jig,
you should add it to the top of your shopping list! It makes it ridiculously easy to drill pin holes for adjustable shelves. And since the jig has hardened case steel guides, your pin holes stay accurate and don’t wobble.
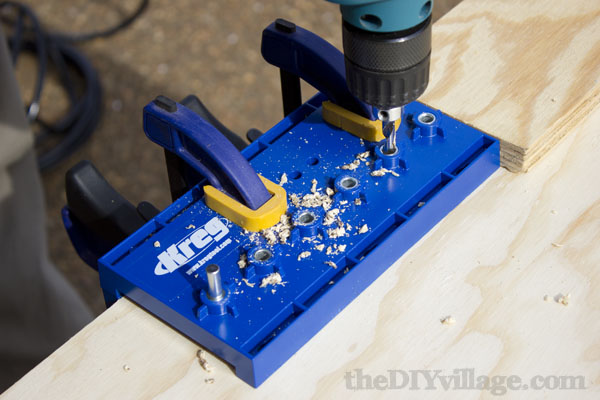
Use a 10″ piece of scrap wood as a spacer to accurately place the jig, resulting in level pin holes. Butt the shelf pin jig against the edge of your scrap wood and the edge of your plywood, then clamp it in place, and drill your holes for your shelf pins.

Once you’ve got the outer cabinets put together, move onto building the middle and upper cabinets.

 Lastly, build the platform that the cabinets will sit on. The platform raises the cabinets up so that when you add baseboard molding, the lower shelf is slightly above the top of it.
 The platform has a support that runs along the center as seen below. It is one of the 18-1/2″ x 5″ pieces accounted for in the cut sheet.

Using a nail gun with 18g 1-1/4″ brads, attach the plywood top to the platform frame.

Before installing the cabinets, you’ll need to attach the luon backing. Check out how Jacque got creative during the pantry update using a Royal Design Studio Stencil on the backing to add her own unique touch!

Installing and Securing the Pantry Cabinets in Place:
Place the three cabinets onto the raised platform connect them together using 3/4″ premium wood screws. Next, install the upper cabinet directly on the top of the the other three and secure in place using 3/4″ premium wood screws. If possible, secure the cabinets to the surrounding stud wall using 2-1/2″ premium wood screws.
Lastly, to finish off the cabinet installation, attach the facing to the frame using a nail gun and 18g brads.
 I think this is a good stopping point for part 1! We’ll be diligently working on getting part 2 out as soon as we can!
In the meantime, I’d love to get your feedback on the pantry plans.
After all, this is our first time using Google SketchUp on one of our projects!
There are affiliate links in this post, however, the opinions and statement found here within are completely my own.
OK Matt Knowlton…I am impressed. This is amazing. You rocked the Google SketchUp. Even though I would never attempt something like this myself, I really enjoyed reading how it was all put together. I especially liked reading the list of tools. Very fun!
Awsome post! Tool list, cut list, material list, it has it all. Outstanding work as well. Keep it up.
Wow oh wow oh wow…I kinda think I could do this now. Great information!
Ya’ll knock my socks off!! Amazing!
Thank you!
Ummm…holy cow! That is amazing!
This ROCKS, Matt! I love Sketchup! It’s free and pretty easy to learn, too. I used it for our basement remodel so that Jeremy and my FIL could see what I had planned in my head. 🙂
This pantry is killer. You did a great job.
WOW – that is a seriously awesome tutorial! Adding this to my wish list 🙂
What awesome plans!! Thank you!
So glad you are sharing plans! I can’t get enough of this pantry. I’ve got the Kreg Jig, but that pin jig looks great. I didn’t even know it existed. Thanks!
You are soooo awesome, Matt! I am so impressed.
I just got word that I might be coming into some power tools. I hope it’s what I think it is, b/c I’m going to be a building fool!!! Yay!
We have a landing upstairs and I’ve been dying to make some built in bookshelves and a desk area… Fingers Crossed!!!
wow, awesome post matt! i’m going to make sure ethan sees this! maybe he’ll build me one. 🙂
Love love LOVE this Matt! Thanks for the detailed plans, and your Sketch Up drawings look great! We just moved a shelf from one of our standalone bookshelves into the other so that we could fit more books in just one piece of furniture, and I was really wishing for that shelf pin jig! I did it by hand, and got it right, but the measuring was painstaking! Blech. 🙂
This is a great pantry project. Both design and execution of the project were fantasic. You both do great work and I really enjoyed the post!
WOW! Most impressive – turned out beautifully! Love it 🙂
Great job on the tutorial and for using Google Sketch-up! You have definitely inspired Jon to get working on our pantry!
This looks fantastic! You took a plain pantry and turned it into a beautiful piece of cabinetry! Great job, guys!
WOW! That is so very cool. I’m going to have to give this some thought. We have a deep closet rather than the wide shallow bi-fold kind. But what you’ve done is SO good looking. Wow.
You both are so talented!!
I gotta learn how to use SketchUp and Kreg Jigs 🙂
Thanks Jeff! If you have any questions on using SketchUp, definitely get in touch with Rayan from the Design Confidential. She’s who taught the class that I sat through at SNAP! And the Kreg-Jig is an absolute game changer!
Love the pantry. Have been pondering what to do with ours and this looks like a great option. One question: why did you choose to build the boxes the width of the door opening? Would it have been too difficult to cut the sides to match the width of the pantry itself?
Thanks Ted! And good question! We actually expanded the pantry opening to accomodate for a larger built-in by reframing a good portion of the existing stud wall. We originally wanted to fill the entire width of the pantry and not just the opening, but couldn’t go any further on the left side as there was an electrical box that houses a switch within a few inches of the inside of the opening. And on the right side to accommodate for the look of symmetry, we built to the width of the opening rather than the full width.
Thank you!
I know you could spend less but can you give us an approximate cost of what was spent on the project? Just for supplies.
My husband and I LOVE the pantry plans! We love it so much that my husband is building me one using your plans! YAY!! Have you posted Part 2 of the plans yet? My husband wants to make sure he gets those sliding drawers right. Thanks so much!
Woohoo! LOVE this project! We, too, have 9-foot ceilings, ands a pantry cupboards with lots of wasted space at the top. I removed all the (horrible) wire shelving, and reconfigured the shelving layout, but still have about a foot & a half of wasted space at the top. I’ve often thought that maybe you could put cupboards in above the door, to utilize this space, but that’s as far as I got. This is genius, & I’m definitely doing this in our next house (preparing to sell, now).
One thing : for goodness sake, get yourself a Kreg K-4 Master jig – made my life so much easier! You deserve it!
Woohoo! LOVE this project! We, too, have 9-foot ceilings, and a pantry cupboard with lots of wasted space at the top. I removed all the (horrible) wire shelving, and reconfigured the shelving layout, but still have about a foot & a half of wasted space at the top. I’ve often thought that maybe you could put cupboards in above the door, to utilize this space, but that’s as far as I got. This is genius, & I’m definitely doing this in our next house (preparing to sell, now).
One thing : for goodness sake, get yourself a Kreg K-4 Master jig – made my life so much easier! You deserve it!
We have almost the same pantry layout as you! Even though it seems large, I have a hard time fitting things in and there is a ton of wasted space!
Are the plans for part two posted anywhere? This is an amazing transformation! Thank you for sharing!
This is amazing! Where’s PART 2? Ready to get started!!
Have you written part 2 yet? I am about to start on a pantry and I’d like to read through your whole project for help please!
what about the luan? where and when and how? need a small drill length to screw kreg screws into the other side of 14″ side cabinets.
Love the idea. When will the second part be available?
Love this but still waiting on part two. Are you still working on it?
Your pantry is amazing! You and your hubby make a wonderful team!